24
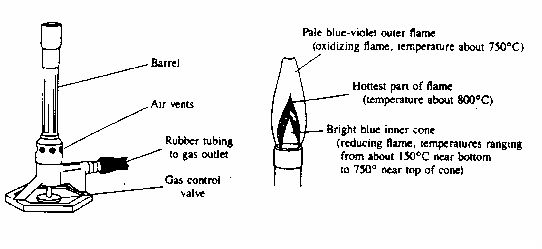
Gas and air are mixed in the barrel and burn as they emerge at the top. Both the flow of gas
and air can be controlled by valve arrangements at the base of the Bunsen burner. Your
laboratory instructor will demonstrate the use of these metering arrangements. The inlet for the
gas is the screw valve in the centre of the base of the burner and the air inlets are the holes at
the bottom of the barrel. If you increase the flow of gas, the flame will rapidly become larger,
change from blue to yellow and wave in any breeze or current of air. If you increase the flow
of air by further opening the air vents, the flame will get smaller, change from yellow to blue
and begin to roar.
If you cannot get the burner to light, immediately turn off the gas and
consult your laboratory instructor.
Once your laboratory instructor has demonstrated the lighting and use of a Bunsen burner, prepare
to light your burner in the following manner.
NOTE: Be sure you can get a spark from the striker BEFORE you turn on the gas!
1.
Shut both the air supply opening and the gas valve at the base of the burner.
2.
Open the gas valve by turning the screw one complete revolution. Next, open the air supply so
that the openings of the air vents on the barrel of the burner are approximately one-quarter
exposed.
3.
Light the burner with the striker. The spark is formed on the underside of the striker so this
side must be oriented towards the gas stream. The flame should be large and yellow.
4.
Slowly open the air vents to increase the air supply until the main part of the flame is colorless
and a small inside blue cone is visible.
